 |
for 7th Grade Wheel Art at Rosedale Middle School |
 |
Internet Lesson Plans
by Woody Duncan
<<<<contact
me at mailto:wduncan@kc.rr.com my
web site is http://www.taospaint.com
>>>>
|
|
for 7th Grade Wheel Art at Rosedale Middle School |
|
|
|
|
|
| FOCUS - The major focus of this lesson is to surreptitiously introduce the teaching of math concepts across the curriculum. |
| OBJECTIVE / OUTCOME - The student will produce a tesselation of original design, developed using an equilateral triangle, where three unique symmetrical faces rotate through out their creation. |
| MOTIVATION / EXEMPLARS -The art of M C Escher and the mosaic designs of thr early Moorish Mosques are excellent examples that can serve to motivate students and serve as historical exemplars. |
| TESSELLATION | PLANE (SURFACE) | EQUILATERAL TRIANGLE |
| TWO-DIMENSIONAL | RHOMBUS | TILES |
| SYMMETRY | TRANSFORMATION | REFLECTION |
| COMPASS | HEXAGON | CENTER OF ROTATION |
| POLYGON | MIRROR IMAGE | ROTATION |
| MOSAIC | REPETITION | VARIETY |
PROCESS / METHODS
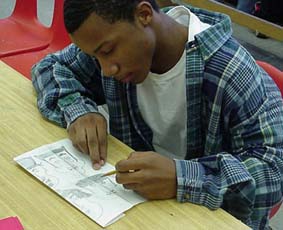
| We begin by drawing symmetrical faces. I give each student an 8 1/2 x 11 with 4 vertical lines. They are to draw half of a face (front view) next to each vertical line. Then they fold on the lines and carefully trace the other side of each face. Unfolding the paper should produce a complete "symmetrical" face, each side being a reflection of the other. Even at this point I instruct students to make each face as different as possible from any of the others. This initial step is an opportunity to develop ideas, and to practice the skill of tracing. We find the classroom window to be better for this purpose than using a light box. |
 |
 |
Worksheets with two equilateral triangles (rhombus) should be made available to the students next. Some may start over several times. The teacher needs to insure that the triangles they are given are as perfect as possible. Each minor error increases the problem of correctly matching the finished designs into a tesselation. |
|
BY THE TEACHER IS NECESSARY FOR SUCCESS |
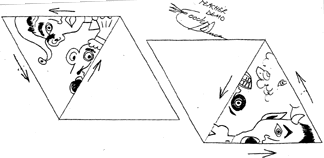
Students should be instructed to draw three 1/2 faces on the inside edges of "one" triangle only. The faces should be as different from each other as possible, to provide variety in the design. I often use as examples - a clown. a cowboy & a little girl (or) an angel, the devil & a monster to begin them thinking about contrast. The final designs rotate best if each of the three faces points in a different direction. In other words, if no two tops of heads point toward each other. |
| Each of the three faces should somehow fill the entire space available. This is best done in a creative manner, for example - the hair on one head can become the fur collar on the next face when viewed from a different perspective. Another two faces might share lines and shapes that viewed one way looks like the crown of a queen, but from another angle becomes the shirit of a sailor. The most difficult problem is utilizing the space in the center, of the triangle, between the three heads. I should not be left empty. It works best when somehow the shapes of the three 1/2 faces blend together to fill this space. |
 |
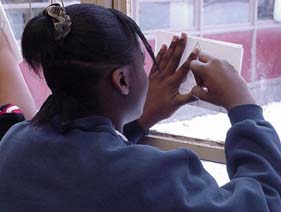 |
After the three faces inside one triangle are finished, the lines should be darkened. (This makes them easier to trace and they will copy much better, later on the copy machine). Next carefully fold the paper so that the two triangles line up percisely as seen through the folded paper. Explain to the students that they are folding the rhombus on the center line and that the edges of the paper itself will, most likely, not line up. At this point the students should carefully trace the image of the first triangle onto the second. This traced reflection should be an exact copy (as much as possible) inorder for later xeroxed copies to match up with each other. A more dramatic and visually striking design will be produced if the students also darken in areas in the design. This too must be symmetrical. |
| If you Have access to a good xerox
machine, twelve copies should be made of each design. If the students
put their name outside the triangles, their name will be on every copy
made. When cutting out the 12 rhombus shapes, do it carefully and
exact, one at a time. They must be as percise as possible.
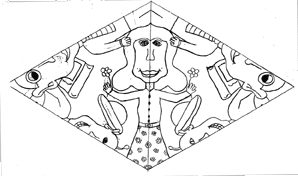
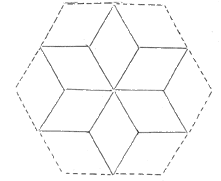
Practice laying out the design before trying to glue it down. Arrange 6 shapes into a six pointed star first. Then the remaining shapes should fit in between the points of the star to create a hexagon. Of course if you made more copies and had a larger surface to cover, you could have your design continue on and on. Glue shapes down carefully, making sure they match. You may need to adjust shapes or overlap a bit to make everything fit. Each error in drawing, folding, tracing, copying, and cutting multiplies the problems in getting the final design sections to aline. |
 |
| PROBLEMS -The image (Rhombus/Triangles)
sometimes seem to get streached while they are being copied in the machine.
The teacher needs to be aware of this and watch for the problem.
Make the students aware also so they do not become frustrated with their
own abilities. In a perfect geometric world, it should work.
ADDING COLOR - Colored markers make these tesselations really look fantastic. To do the color correctly (tessellate the colors also) each time a shape repeats in the design, the color should repeat as well. MATERIALS NEEDED -
|
 |
 |
REFERENCES -
The World of M C Escher
Introduction to Tessellations
|
| ONGOING ASSESSMENT -
Assessment of student learning should be an ongoing monitoring process done while assisting students in the new learning. Monitor how well students grasp the new concepts and assist only as needed as they progress through each step. Help enough to avoid frustration but don't solve every problem for them. FINAL ASSESSMENT -
|
  |
| INFORMATION ON THIS AND OTHER
LESSONS -
Can be obtained at http://www.taospaint.com |
END